Showing posts with label DIY. Show all posts

Friday, October 11, 2013

Dream Catcher Wall Art

Since I didn't originally plan to post this craft to the blog, I didn't take many pictures of it so, sorry! But anyways, I saw a post on Pinterest of this ADORABLE earring holder that just happened to look like a dream catcher, and I decided to make one of my own.
Items needed:
  • Cross Stitch Hoop
  • Embroidery Floss
  • Scissors
  • Spray Paint
Since I don't have pictures to show you my steps, I figured I'll just show you the ending product, and describe all the steps of how I got there(:
First, I spray painted my three hoops different colors and let them drive for a couple hours so I could tie the floss around them without ruining the paint job. Next, I looked up some different pictures of how to tie a dream catcher and tried to copy those as much as I could, and also used some of my own designs. I made sure they all looked at least a little different. At every crossing I tied two knots to make sure the string didn't ever slip, and was tight. And that's pretty much it! Very simple craft and you can add your own elements into it to make it personal.

Here's how it looks up on my wall. I've decided to leave them empty and to just be an art piece instead of serving multiple purposes.  Thanks for reading!

Friday, August 16, 2013

How to make your own infinity scarf!

HELLO EVERYONE! I'm back today to share with you my newest craft--How to make your very own infinity scarf!

Believe me when I tell you that it is EASY! I am not a seamstress by any stretch of the imagination. I can sew a straight line with a sewing machine, and that's about it. And that's all this scarf really takes! So without further ado, I am going to show you how to make this awesome scarf!!


Wednesday, August 14, 2013

T-Shirt Quilt

Hello again everyone, this is Katie!

During Christmas break this past December, I was really contemplating what I was going to do with all of my shirts that I had left over from high school. I didn't want to throw them a way, but I also was tired of wearing them as sleeping shirts. So, of course, me being the crafty girl that I like to think I am, I went surfing on Pinterest to see if there was anything I could do with my old shirts so I could still use them in a different way; that's when I found a post about making a T-Shirt quilt!

I loved the pattern of hers, but the directions weren't all that great, sooooo.... I winged it. And I TOTALLY do not recommend doing so; it caused me a lot of unnecessary stress! I love the way that everything turned out, but I probably will never make a quilt again; at least not the way that I did this one.

Here's some supplies that might come in handy to make your own:
  • Sewing machine
  • Matching sewing thread
  • Scissors
  • T-Shirts
  • Bed Sheet
  • Batting
  • Straight Pins
  • Yarn 
  • Ruler
  • Pen
 So first off, you need to decide what shirts you would like to use, and cut them into the desired shapes of your choice. I did 4x4 squares, 4x8 rectangles, and then my main pieces were the designs on my shirts which varied. I laid out the pattern and how I wanted it to look, and then took separate sections and sewed them all together one section at a time.
 Next I bought a twin size black sheet, and measured where I should cut it to fit with the front of my quilt. I then cut the batting to fit the front, and left my black sheet a little bit wider than the front so I could wrap the batting inside of it, and sew them together.

 Here are pictures of how it looked pinned to the batting while I was sewing it, and after.
Next, I pinned the front of my quilt to the back, with the padding that was showing in the middle. I left a black edge around the front to give it more of a classier, and quilt-like feeling.
 I decided to sew the front on with a zig-zag stitch because I felt like it would hold on better to the rest of the fabric. This picture is just to kind of show you that I am NOT the best seamstress, and you don't have to be either. Your project doesn't have to be perfect for you to be happy about what you have accomplished.  
Yay! One last step! And this one I guess could also be optional, but I did it for extra reinforcement. I bought a needle that would fit yarn through the end, and tied knots on random corners throughout my quilt. 
 Voila! I am so happy with the way that it tuned out, and am proud of all the little imperfections that it does have; no one else has the same one as me.(:


Monday, July 15, 2013

Katie's First Post!

Hey everyone! This is Katie and this is my first post on our blog so far. I am so excited to share all the projects that I have been doing! I am currently working on a t-shirt quilt and that's why I haven't really posted anything yet. I decided that since this is my first post, I would show you guys something that I have done awhile back. Once Kendra made her jewelry holder, I decided to make my own but change it up a bit to fit my personality better.

This is how mine turned out!

 All the steps are exactly the same as Kendra's jewelry holder, except for a few things. I decided to paint mine black with some paint we already had in our home, and then I roughed up some of the edges to give it that antique look. I also felt like five door knobs made the jewelry holder look a little cluttered, so I stuck to only three knobs that I got from Lowe's.


 I really love how it all turned out! It was fairly easy and cheap to do. I hope you all enjoy, and I can't wait for you to see some of my upcoming projects!


New Craft--Turn an old Office Tray into a Jewelry Hanger!

Hey all! I'm finally back!

It's been a crazy few weeks around the Baird household. Mom, Katie, and myself had the chance to perform at the Stadium of Fire in Provo, Utah! It was lots of fun. Kelly Clarkson is fantastic!

Anyways, here's the craft that I've FINALLY finished! I've been working on it in bits and pieces for weeks, and I just hadn't found the time to sit down and finish it up! Today, I'm going to show you how to make a Jewelry Holder from an old office tray! Stay tuned after the break to see how it's done!


Saturday, June 15, 2013

Cabinet door to shabby chic chalkboard.

Hey! This is my very first post to this crafty blog of ours. My first project is a chalkboard I made out of a kitchen cabinet door. Here is the "before" picture of the door that I'll be turning into the chalkboard.


I got this cabinet door from my good friend Nancy who has a son remodeling his kitchen. I paid her $5 for the door. I left the hinges on for added character.

I forgot to get a picture with just the chalk board paint on it. I taped off the the trim and spray painted the chalkboard paint. I'm not much of a spray painter so after a couple coats of the spray I added a couple layers of actual chalboard paint. After that dried I did the opposite. I covered the chalboard paint and spray painted the white trim. I'm not a fan of the spray paint so I think I'll bush on paint the next time. You do whatever you like. The spray pain cost me about $5.99 and the chalkboard paint was $3.99 both at Hobby Lobby. Go online and get a 40% off coupon from Hobby Lobby or download their app on your phone.


If you know me, you know I like things "antiqued" so of course I had to rough the edges a bit and Voila, You now have a new chalkboard! I added a knob down at the bottom in the center but I forgot to get a picture of that too. I'm new at this blog thing... Hopefully I'll get a little better. Enjoy!

Tuesday, June 11, 2013

First Craft-Make a jewelry holder from a wooden picture frame!

Hello everyone! Welcome back!

For my first official craft project, I thought I would start out with one of my favorite and most useful creations: a jewelry hanger! So, here goes!

HOW TO MAKE A JEWELRY HOLDER FROM A PICTURE FRAME


The first thing you'll need is a wooden picture frame. I got the one pictured above from a little store called The Wood Connection. I couldn't find the frames on their website, but here's a link for you guys anyways: The Wood Connection. This frame opening is an 8x10 I believe, but since I'm not using it for pictures, I don't really know for sure. At the store, the frame obviously doesn't come with holes drilled into it. I had my dad drill them for me once I got home. They might be able to do it at the store, but they would probably charge you. The frame itself cost me $12.

The second thing you'll need is drawer knobs. I got mine from Lowe's, but they also have some really cute ones at Hobby Lobby.  I was going for an eclectic look, so I mismatched the knobs but made sure they all had the same finish to them. (Except for the glass one, obviously.) In total, they cost me about $10. I could have saved some money on this step, but I was in a big rush to make this one.


Once we got home, I painted my frame an antique white. Here's a picture of the back: 


On the front, I sanded down the edges and then took a small brown ink pad and "antiqued" the edges and used my finger to smudge it up a little. Here's another picture from the front. My mom held it up for me, but we didn't realize until later she held it upside down.


The next thing I did is cut out chicken wire (my mom had a roll of it for another project) to fit in my frame opening and used a heavy duty stapler to keep it in place. This was the trickiest step for me. Make sure you don't staple too close to the edge of the frame, or the wood might split. Here's what it looked like at this step, with a piece of paper behind it to make it easier to see (thanks for holding it right side up this time, mom!):


Here's a close-up of some of the staples in the back plus the next step: I used some upholstery nails to put picture hangers in the top corners.


Next, it's time to put the drawer knobs on the front! I played around for a while with the arrangement I wanted, but in the end, I was happiest with this:
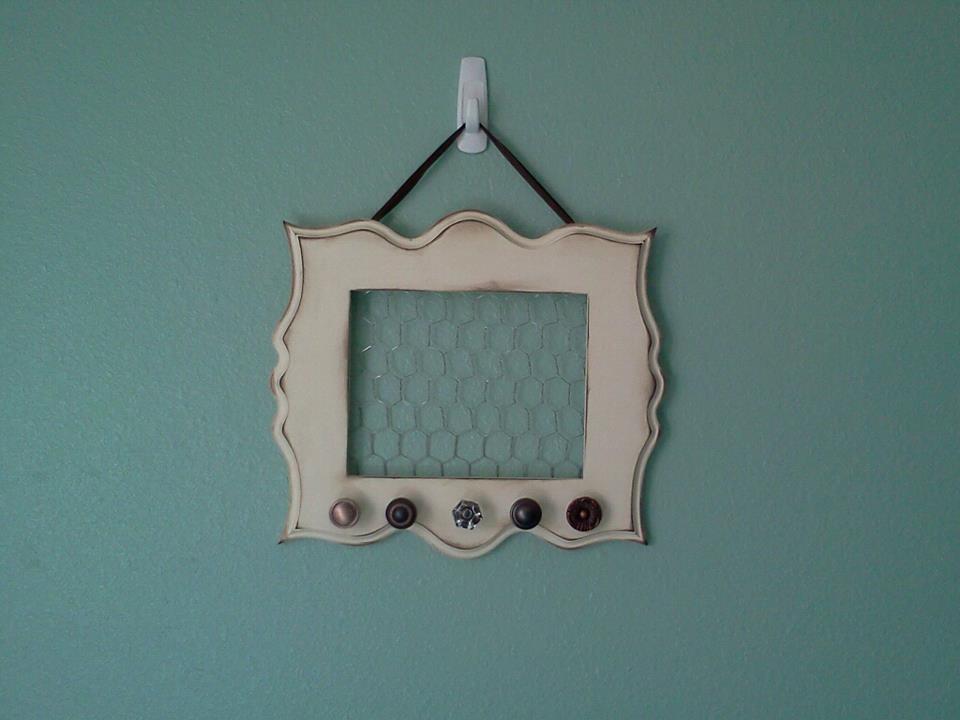


After tying some ribbon around the picture hangers, it was time to put this baby on a wall!

And here it is! All ready to go!

I made this jewelry hanger last summer, and it's still in working order! I use the chicken wire to hang my dangle earrings on, plus my clip-in hair accessories. I use the knobs to hang up all my necklaces.  The only problem is, I now have too many necklaces to fit on this hanger! I guess I'll have to add another jewelry organizer  to my wall... :) Stay tuned for that project!